When the Clouds Open: Team Rubicon's Guide to Diverting Water and Protecting Your Home
Part 1: Sandbags, Wattles, Check Dams, and Burrito Wrap Barriers

Flood cleanup in Twentynine Palms continued on Sunday, July 25, with residents still assessing damage and digging themselves out of the mud and debris. Several household were assisted by Team Rubicon, a veteran-led disaster response organization founded in 2010. While some members were out in the field, Rubicon State Administrator Kevin Kothlow, Southern California Chainsaw Lead and Incident Commander James Coler, and Phil Murray, Operational Security (OpSec) Chief for the Twentynine Palms operation conducted a prevention workshop and shared insights on roof repair and maintenance, sandbagging, and flood-protection methods.
Kothlow kicked off the workshop by discussing the history of Team Rubicon:
We started off in 2010, with the Haiti earthquake under the original premise that volunteers, NGOs, charitable groups move faster than big government. Governments are methodical about how they move in. A lot of NGOs jump in right off the bat.
SoThat's how we were formed.When our founder Jake Wood came back from Haiti, he figured that disasters happen everywhere, and he thought there was a need here in the United States.
SoHe started our organization with about 10 people, and we're over 170,000 volunteers now in the US. We're about 55% veteran, about another 10 to 20% first responders. And the rest are what we call kick-ass civilians, which is anybody that wants to help.
Because extreme weather and flooding are becoming more common in Twentynine Palms, we requested a copy of the Powerpoint used during the workshop to share with our readers. The workshop was based on trainings from the California Department of Water Resources and covered erosion control, check dams, structure protection, temporary levees, and burrito walls in addition to roof-tarping basics. We’ll cover tarping in Part 2. The following transcript has been edited for brevity and clarity.
USING SANDBAGS

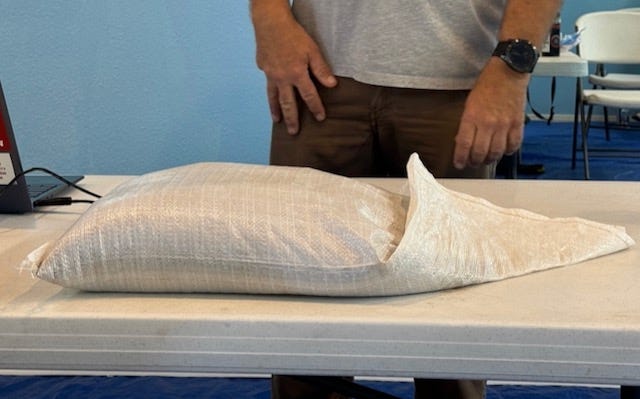
Kevin Kothlow (KK): What you want to do on the sandbag is basically 35 to 50% full. You want it this full for a couple reasons. One, it makes a good base platform for layering and two, it goes back to moving them. If you were filling these things all day long, you'd be wasted. This (the partially empty bag) is more manageable and sustainable – try and keep them at that size.
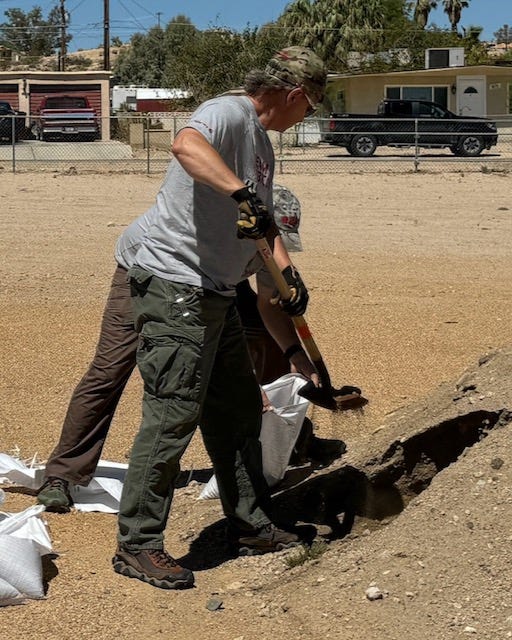
KK: When you're filling a sandbag, it's always best to have two people. One guy is filling the bag. He's got gloves on, he's got eye protection, he’s got a shovel, and then he's got the guy on the ground holding the bag. The easiest thing to do is just fold the collar down and then look away and let your partner fill it up pretty easily. It's about three shovel fulls using a regular garden shovel. When you’re done, just grab it, drop it right behind you and get the next one. Grab a bag, drop it, grab the next one. Don't be moving it, stay still, otherwise you're just expending a lot of energy – it’s faster to do one thing at a time.
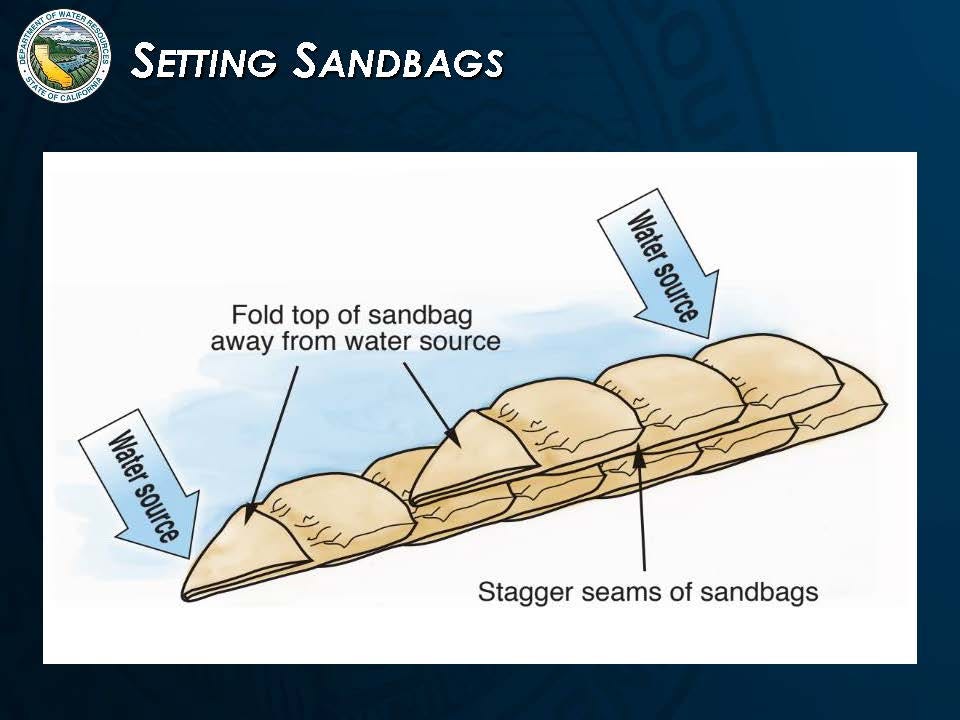

KK: You don't need to tie sandbags. Once you place them, you're not going to be moving them at all. You're going to lay it out…but you basically just drop the bag, let it set kind of like wet cement.
If you’re expecting the water to come this way, you're going to take this corner right here and you're going to fold the top away from the water source. You're then going to take the next bag and you're going to place the body here (motions to filled end of next bag) on top of here (motions to flat fold of the prior bag), and then do the same thing…. Notice you've got a nice flat surface, so you can build a couple courses on this without it rolling over.
10 sandbags are never enough, and burlap is better
KK: Stone [James] is going to kill me for this, but I make fun of the fire department all the time because you'll see posted “Come get your 10 free sandbags” (laughter). If you're trying to protect your structure from the larger rains that you had, you're going to need more than 10 sandbags. You should probably collect bags as you go along. Leave them empty, just have a stack of your own so you can actually put them out pretty quick.
Audience member: Quick question about the type of bags the fire station was giving out burlap bags...
KK: Burlap are the better bags.
Audience member: Why? The sand falls out.
KK: Well, one, you could get more in the bag. It's a bigger bag and that doesn’t mean, overfill the bag and make a Tootsie Roll. And two, they're much stronger. They don't break down in the UV light. These things (motioning to the plastic bags) actually kind of burn your hands when you're carrying them. They'll slip through your hands, and they're going to burn due to the friction.
Audience member: They also disintegrate within like zero time. Because I laid them in front of the garage for last August’s hurricane, and they were already disintegrated by March.
USING WATTLES FOR EROSION CONTROL
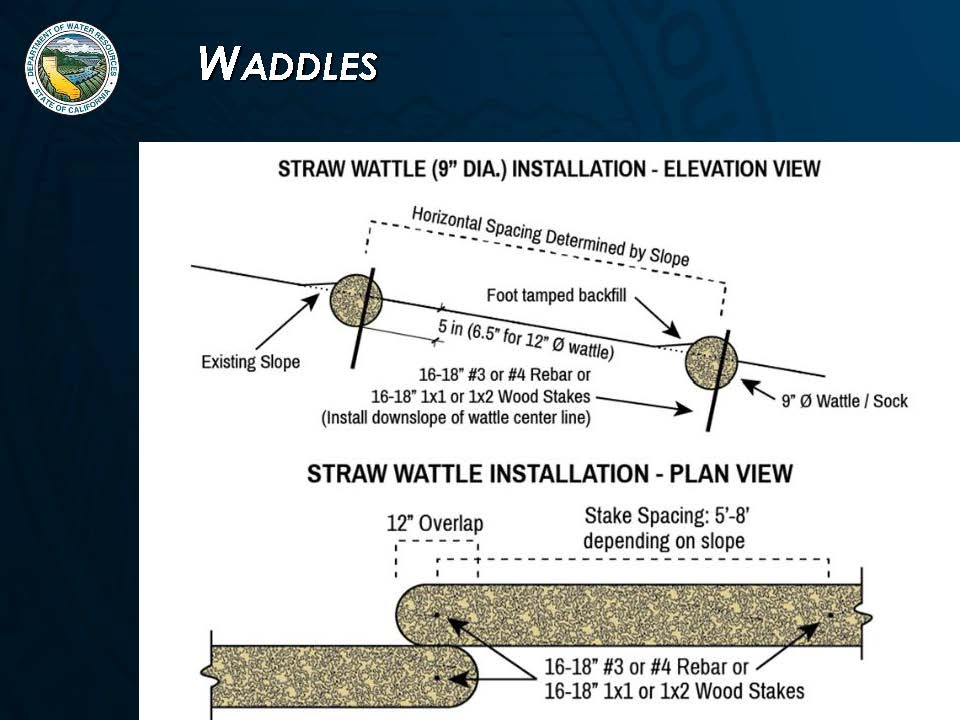
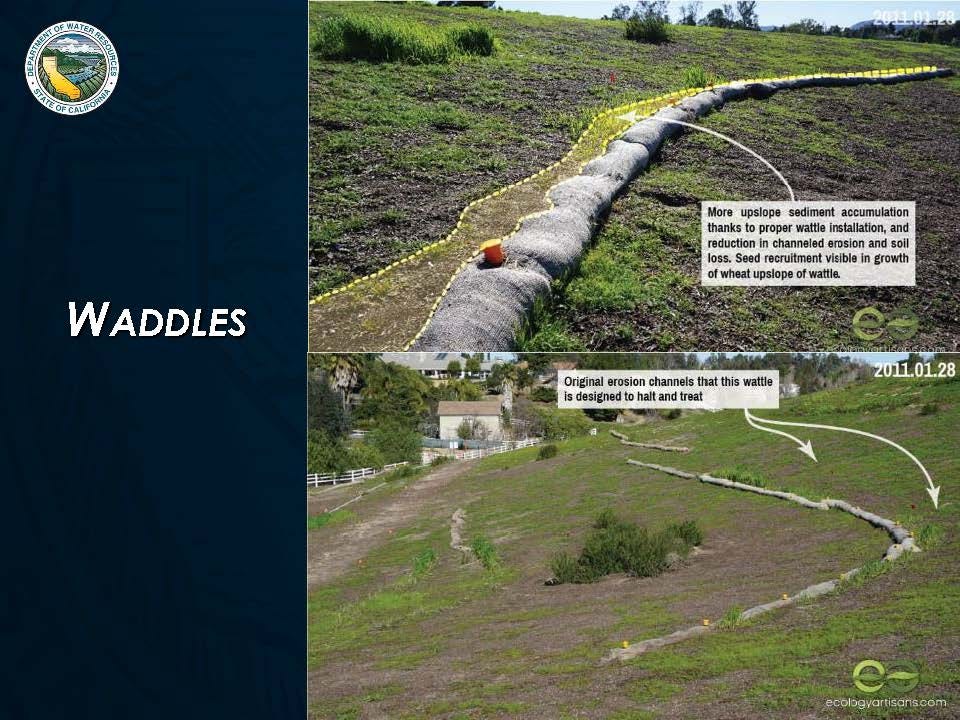
KK: Wattles are not meant for water protection, they're for erosion protection. With this big storm that you had, water flow may have eroded channels in your yard. Wattles are a good way to fix that—kind of a Band-Aid on the landscape.
To place wattles, you have to dig a hole. You don't lay them out like a hose, you’ve got to dig them in a little bit. When it rains, it’s going to be carrying sediment, and it’s going to stop right there (motions to the upslope side of the wattle on the slide). And it's going to start filling up. It's patching those holes that you want patched that have been damaged. As it continues, the straw is going to stop the dirt and let the water pump through. It’s ok if water goes over the top.
And then you're interlocking just like that (refers to plan view on the slide above). Use wood stakes or dowels because they will break down with time. A lot of people use steel rebar — the bad thing about steel rebar is it's there forever. So when your straw is gone, you're going to be cursing one night when you kick one of those things walking through your field.
Stone James (SJ): So you have the crack, you put the wattle just south of it…
KK: Yeah, just south1
SJ: So not in it, not above it…
KK: just south of it so that the water is going to hit the wattle, it's going to slow down. Speed carries the debris and as the water slows down, it's going to drop the debris and the water is going to fill up and then go through the wall.
CHECK DAMS FOR BIGGER HOLES
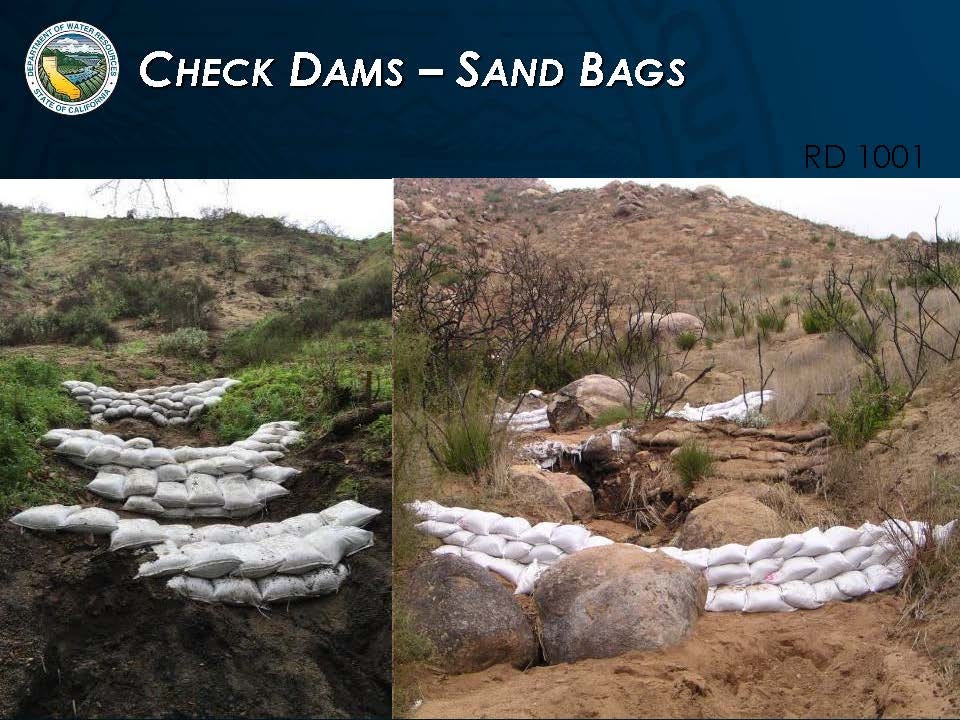
KK: For bigger holes we have what are called check dams. You see them a lot with burn scars, where water can move at a high speed. We build the sandbag wall here, one here, one here, and up the ravine (refers to slide). When you get heavier rains, the dams check the water and slow it down. Water will drop all of its debris in here. It's going to flow over, and what goes over that diversion is going to fill up this little pool anddrop its debris there (motioning to the spaces between the check dams). That is the best place to put the burlap bags because they don't look ugly. They fit in with the landscape. And over time it's going to repair those erosion points.
KK: Here’s another example—you can use hay bales for the same thing. Again, don't use rebar on these things. You just put them in a big wall and reinforce them. You've got to make sure you stake them down because if you do get the big rains and they're not staked down, they become projectiles. They're gonna clog up a roadway or a culvert somewhere and make a major mess.
TEMPORARY LEVEES
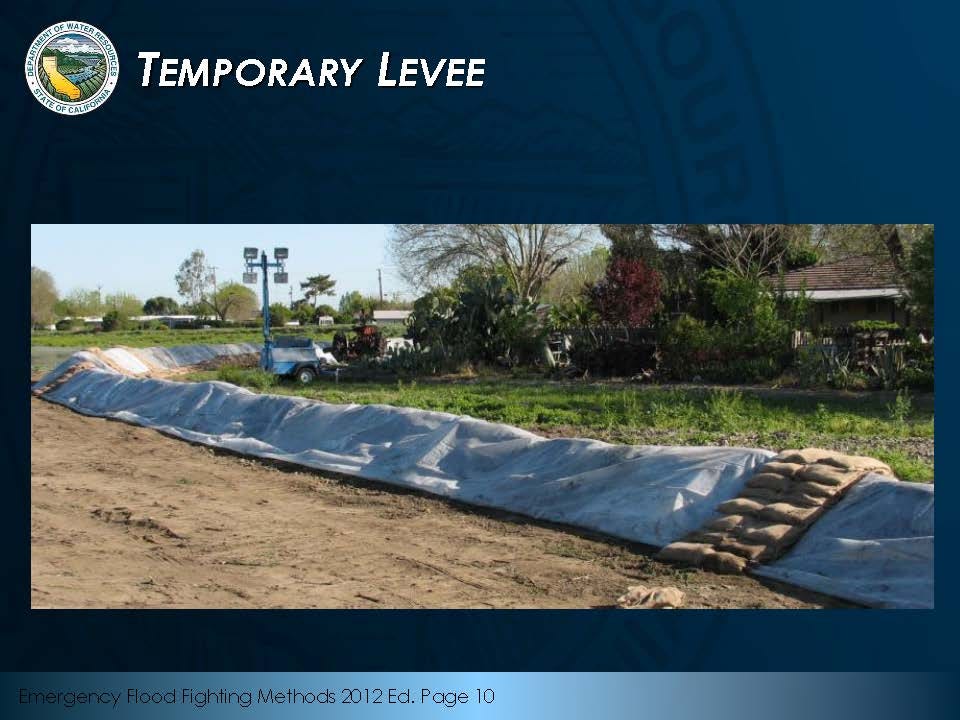
KK: This is a temporary levee, something that I think is really big for some of your larger projects rather than putting out a lot sandbags. We use Visqueen,2 which you typicallybuy from Home Depot in 100-foot rolls—it’s either 10 feet wide or 20 feet wide. You roll out the Visqueen and then pile the dirt in it. Once you've got your barrier wall built with the dirt (potentially using a front end loader), then you take the Visqueen and you fold it over the wall just like we have in here. Then you sandbag in back and you sandbag in front, and that turns into an instant barrier.
You might say, “I don't want a giant black Tootsie Roll in my front yard all the year.” What you do is that you make it dirt. Take the Visqueen off, you roll it up and cut it. When you see rain coming, you can immediately pull it out and drape it over, and you’re protecting. It's not breaking down inside and you don't look like you've got crap in your front yard that all your neighbor are going to complain about. You’re preparing yourself. When you need it, you can execute it and then put it back away.
Audience member: Would a tarp also work versus Visqueen?
KK: Yeah, it would but it's gonna deteriorate.
Audience member: But if you roll it back like you were saying….
KK: The Visqueen is going to work better because tarps leak and Visqueen doesn't. This is really thick plastic. It's not trash-bag plastic. It's thick. It's like a construction bag. Go to Home Depot, just say you need a roll of Visqueen. I'm thinking it's probably like 35 bucks for 100 feet. It's incredibly cheap.
Phil Murray / Team Rubicon (PM): And if you go to the paint section, you'll see the five mil plastic—that's what you're looking for.
Audience member: It’s five mil?
PM: Don’t quote me on the mill but there's thicker plastics there.
KK: The state uses six mil in all their projects.
STRUCTURE PROTECTION
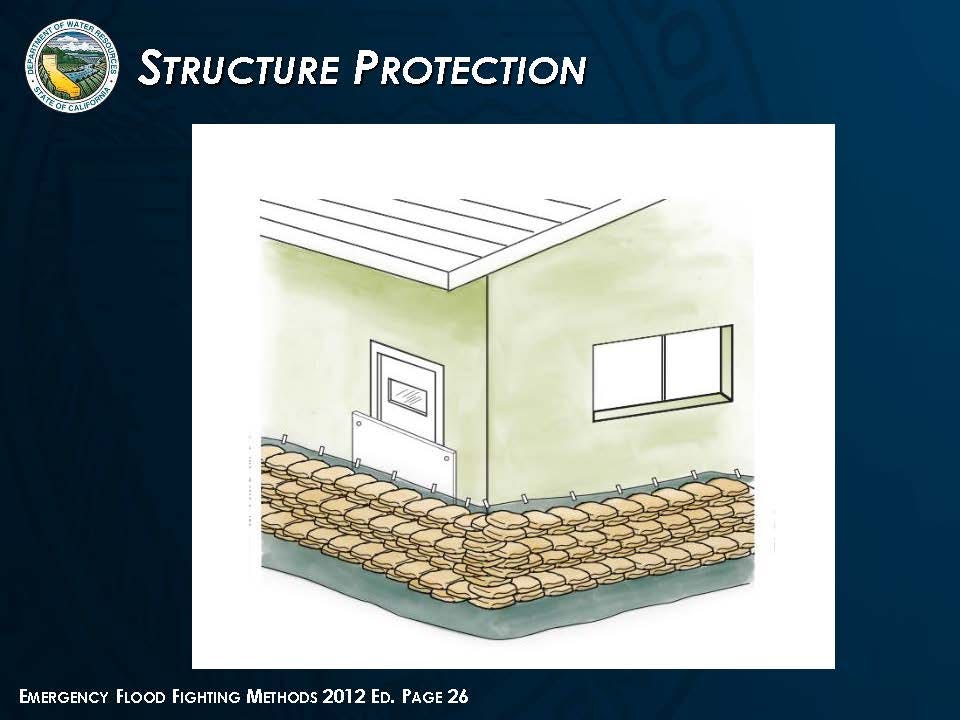
KK: Structure protection — you can do it like this. But can you imagine the resources this is taking and how long it takes to do something like this? The State recommends you do it like this.
This is another use for the Visqueen. You wrap the house, stapling at the top of the Visqueen. It just has to hold up in place. If there’s a window vent, you need it to be more stable. And then, you sandbag around the bottom. If you're expecting debris flow to come down and you're trying to protect the plastic from ripping, that's when you need the higher sandbags. But if you’ve got a row of two or three sandbags around the bottom to keep the plastic down and you've got the wall up, that's a really good method to protect your house.
Duct tape is your friend, so you can duct tape if you have stucco and you can’t get the staples in. The State recommends that you plywood any vents. So If you've got a raised foundation, plywood the vents. They're weak points. The water is going to put pressure on the door, it's going to put pressure on the vent, and that's when it's going to go through.
BURRITO WRAP
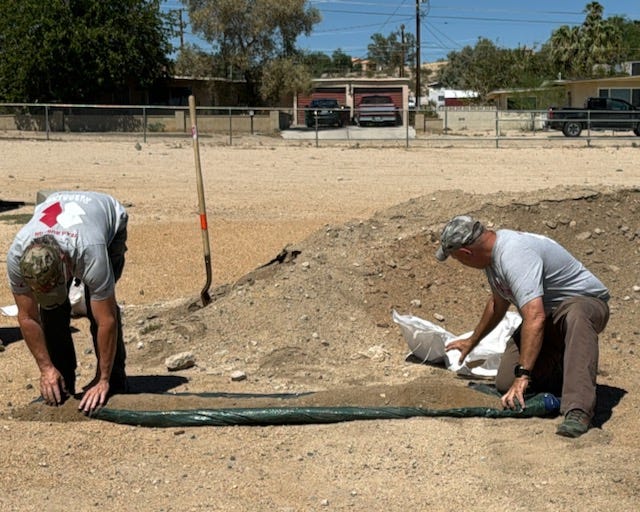
The burrito wrap can be as large as temporary levee or as small as a row of sandbags. The construction is similar to the temporary levee described above. A tarp is laid on the ground and filled with dirt or sand leaving sufficient clearance on the tarp edges so they can be folded over the top and secured with sandbags or other heavy objects. Kothlow pointed out that this is a way to make a quick barrier from a tarp or Visqueen if you have dirt or sand but are short on sandbags.
We are working on Part 2 on tarping a roof and hope to release it next week.
Feel free to share this article!
Leave your thoughts in the comments below. Please note that we do not allow anonymous comments. Please be sure your first and last name is on your profile prior to commenting. Anonymous comments will be deleted.
Many communities in the Morongo Basin are economically disadvantaged, so our coverage will always be free. However, if you have the means to support our work, we always appreciate upgrades to a paid subscription. Your upgrade helps keep subscriptions free for those who cannot afford to donate.
Note that donations in excess of $100 are tax deductible to the extent allowed by law, and your subscription/donation will be listed as AHA Projects, the name of our fiscal receiver, on your statement. Donations over $100 can be made via the Aha Paypal.
The discussion about placing the wattle on the south side is assuming that the flooding is coming from Joshua Tree National Park, which is south of most neighborhoods in Twentynine Palms.
A type of polyethylene film called Visqueen is commonly used as a vapor barrier and protective covering. Visqueen is typically made of recycled or reprocessed polyethylene, making it an environmentally friendly option. Construction, agriculture, and horticulture industries often use Visqueen film. As a moisture barrier, it prevents water from entering structures and prevents mildew and mold growth. Additionally, it is used to cover and protect crops, as well as to create temporary enclosures during construction.


